Level of Detail
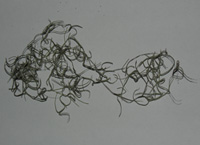
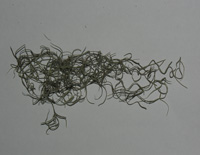
The animations on this page demonstrate the support offered by RenderMan for level-of-detail (LOD). Three models of a short length of Spanish Moss (Tillandsia Usneoides) were made in Maya. Using LOD the renderer selects the appropriate model to render based on the area of screen space occupied by the model.
For this project, it was important to me that I captured the complexity of the Spanish Moss, and not just model one strand. This way, you can really push the boundaries of the exercise.
 |
 |
 |
 |
These reference images demonstrate the complexity of the spanish moss. I proceeded to write some expressions in Houdini L-Systems to capture a similar look.
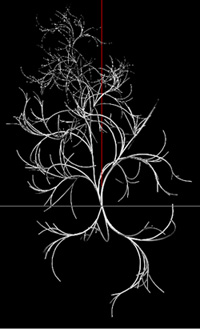 L-Systems Generation 5 |
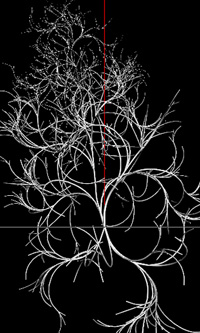 L-Systems Generation 6 |
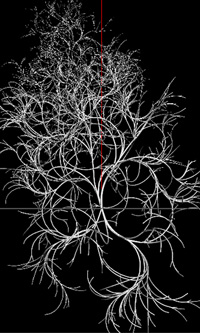 L-Systems Generation 7 |
Through these examples, one can see the possibilities of compound detail with L-Systems. For those interested in persuing this project and others using this meathod, I will give you a brief rundown of my L-Systems Logic.
The Rules
L-Systems can be governed by Rules, Functions or even conditional statements. These rules can be visualized as drawing a line in a specific XYZ position with each command given. This is the basis of L-System rules:
F - Move forward a step and draw a line
f - Move forward one step without drawing
+ - Rotate right 90 degrees
- - Rotate left 90 degrees
& - Pitch Up
^ - Pitch Down
\ - Roll Clockwise
/ - Roll Counter-Clockwise
[ - Start a Branch
] - End a Branch
With this basic knowlege of the system, here is a snapshot of the rules guiding this Spanis Moss:
The Premise, or foundation to build upon says execute established rule "D"(controls the branches beyond -Y axis), Roll Counter-Clockwise twice, Pitch Up, and rotate 180 degrees. Execute rule "B", move forward once, execute rule "C", move forward once, pitch down, move forward twice, roll three times, etc.
Rule 1 says "A" will create a branch, pitch up, move forward once, pitch up, move forward once, then execute rule "B" within that branch. It will then roll three times before it create another branch and executes what is within the square brackets.
These rules reference each other based on the premise, and can create very interesting results. Finally, i set my angle to "20" to get the desired results.
For this project, the curves are generated automatically by changing the geometry type for the L-Systems to "Skeleton". Generate Medium and High detail meshes by setting geometry type to "Tube" and changing appropriate "Rows" and "Columns" values.
There is a specific proceedure to export L-Systems curves from Houdini for use in the project.
Connect a transform node to the L-System. Use this to set the spanish moss to approximately 1 unit wide by 2 units long. Middle click on the transform node to see bounding box data. Adjust it based on the project specifications. Attach another transform node, which will "freeze the transformations" according to maya terminology. Create an "Attributecreate" node and attach it to a new "attribute" node. This is where you will create the "constantwidth" variable that will let the renderman interface control the curve width.
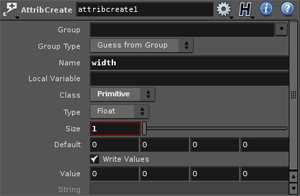
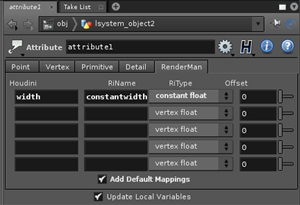
Create an attribute in "attribcreate" node called "width". Set the class to "primitive" and type to float. Attach this node to the "attribute" node and go into the "Renderman" tab of the Attribute node. Create the attribute "width" and in "RiName" type "constantwidth". Set the RiType to "constant float". Connect these two nodes to your last transform node and export the geometry through the Attribute node into a RIB. If you view the code the RIB file should end like this:
0.04703555 1.26373 0.5124174
0.04820256 1.267284 0.5286696 0.04369053 1.26977 0.5445312
0.04703555 1.26373 0.5124174
0.05159947 1.262709 0.5284255 0.05347155 1.256595 0.5438282 0.05242599 1.246126 0.5567681
]
"constantwidth" [ 0.008]
# Done poly-curves
Give the constantwidth variable a starting value of "0.008" The curve is now ready to render.
Implementing Renderman from within Houdini
Originally, I was going to work with Maya from here on, but then we decided to take the project to the next level and attempt to animate the spanish moss strands. The most efficient way I know to do that is using point instancing combined with the Houdini pin constraint system. I will get to that shortly, but first I will explain how to set up a successful Renderman-Houdini workflow since I haven't been able to find any documentation on how to do this. Thanks to Ryan Bowden for showing me how to do this in the Linux environment.
The great thing about working with houdini is that alot of Renderman proceedures are built in, so you can get both interfaces to connect through the UI without the need for extra scripts. This is extra handy when it comes to using RIBS to render proxy geometry.
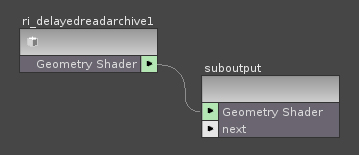
First, go into SHOP and create a new material. Inside that material add the "ri_delayedreadarchive" proceedure. The properties tabs of this proceedure allows you to import RIB, and also adjust the RIB bounds from whithin houdini. Promote this into a shader.
Next, go into the Outputs network and create a new renderman renderer. Here, you will set the environment variables. Click on the "Properties" tab, then the "Paths" tab. The "Shader Path" option box should contain the information below. Each path is separated by a colon.
[PIXAR RENDERMAN PRO SERVER SHADER PATH]:[CLASS DIRECTORY SHADER PATH]:[RENDERMAN STUDIO SHADER PATH]:[HOUDINI RENDERMAN SHADER PATH]
Here is the above information, set up for my work environment:
/opt/pixar/RenderManProServer-14.2/lib/shaders:/home/jburne22/Desktop/SFDM-STU-HOME/vsfx319/shaders:/opt/pixar/RenderMan_Studio-1.0.1-Maya2008/lib/shaders:/usr/hfs9.5.303/houdini/ri_shaders
Rendering RIB Archives via Point Instancing
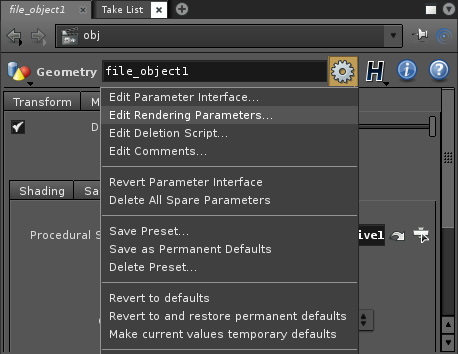
There has been a problem for a few students using Houdini who could only render multiple proxy objects by duplicating "geometry" nodes at scene level. This is very inefficient as Houdini has to render many unnecessary geometry in viewport. Using point instancing adds for a much cleaner workflow. Go into scene level and create a new "geometry" node. Click on the Render > Geometry tab for that object and enter the path for the shader we just created into the "Procedural Shader" box. Go back to scene level and add point instancing to your "Geometry" node. This is done by creating new "Rendering Parameters":
 |
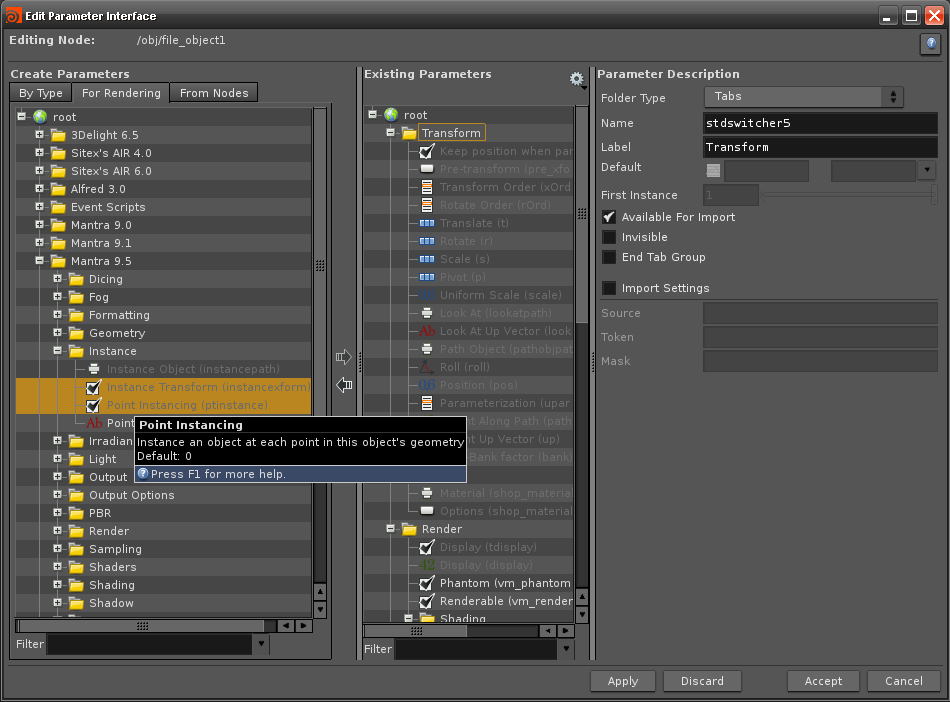 |
Add two rendering Attributes: "Instance Transform" and "Point Instancing". A new tab will be added to your geometry node. Make sure these attributes are turned on in the new "Instance" tab. Go into the geometry node, and add a "line" node... or even create a curve.
When you render, your RIB geometry should appear in place of each point on your line/curve. Points can even be generated using particles.
Extra Notes/Renderman-Houdini Implementation on Windows
Implementation on windows is pretty much the same, except I find that sometimes you may have to edit the houdini.env to make renderman the default renderer for RIB files. Add this to the bottom of the HOUDINI.ENV file. Include your custom shader location in "HOUDINI_RI_SHADERPATH" if it applies.
# set up for prman13.0
HOUDINI_DEFAULT_RIB_RENDERER=prman13.5
HOUDINI_RI_SHADERPATH=C:\Program Files\Side Effects Software\Houdini 9.1.179\houdini\ri_shaders
In addition, it may be necessary to point your render node explicitly to the prman executable.
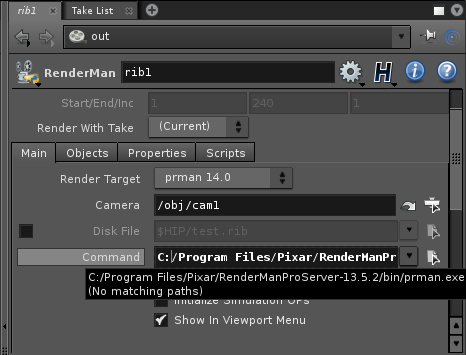
Set the environment variables in your render node to point to the windows shader directories and you should be ready to proceed.
 |
 |
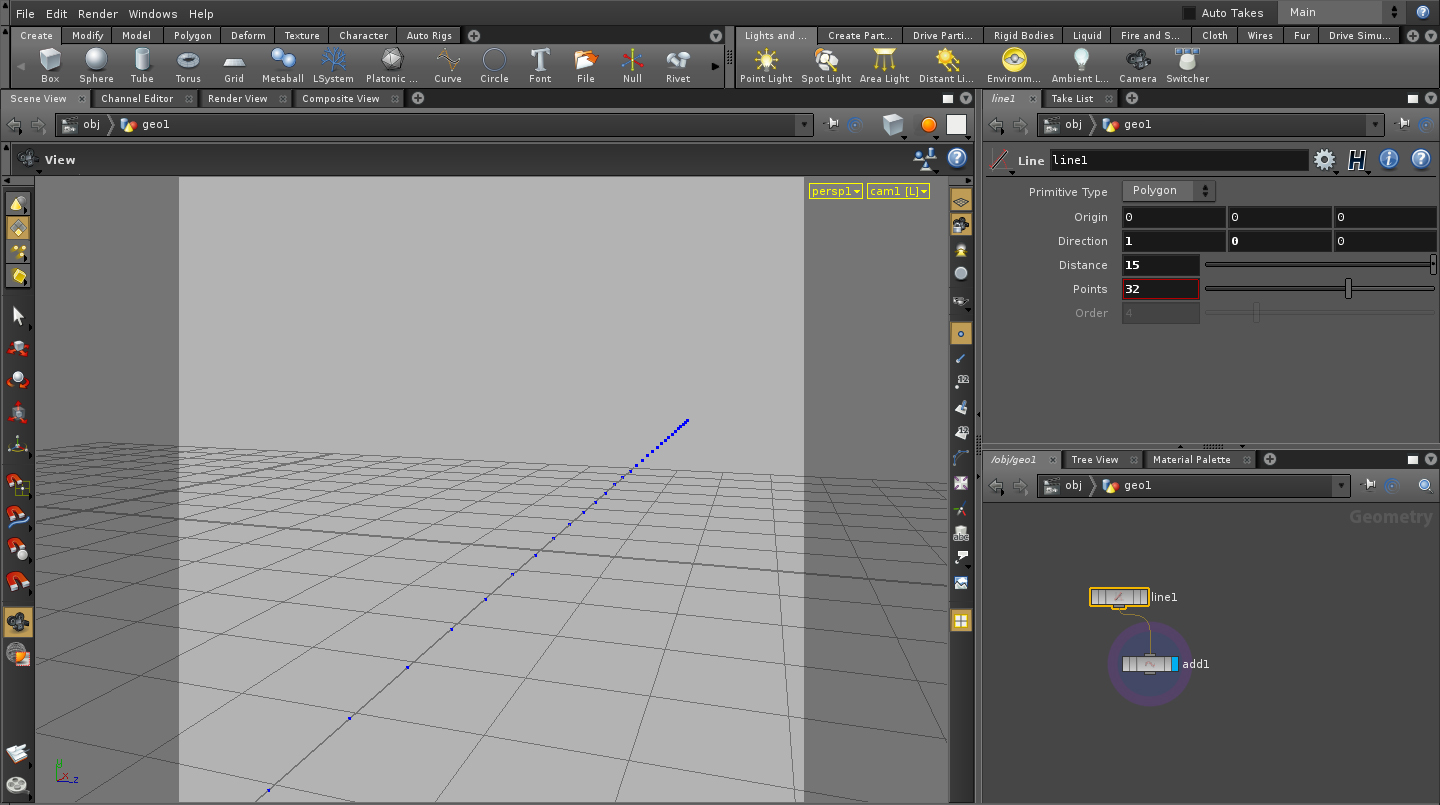
I used a simple line in Houdini Consisting of 32 points. I then Instance each spanish moss to a corresponding point on the line. Because of the amount of detail in my spanish moss, I phaze out High-Rez model quite early.
AttributeBegin
Detail [-0.5 0 -0.5 0.5 2 0.5]
Color 0 0 1
DetailRange [ 1 1 3000 38000 ]
ReadArchive "C:/mossCurve2.rib"
Color 0 1 0
DetailRange [3000 38000 100000 400000]
ReadArchive "C:/MediumRez.rib"
Color 1 0 0
DetailRange [10000 500000 1000000 4000000]
ReadArchive "C:/HighRez.rib"
AttributeEnd
Constructing a Wire Pin Constraint Rig
I developed a Wire Pin constraint network in houdini to get interesting dynamic simulations of gravity, wind, and drag forces affecting the moss. I will explain here how it is done.
The main idea was to instance my RIB files onto points instead of actual geometry. I started by creating a simple line with a few points. Next, I imported my simple polygon tree mesh. I selected a few points from a branch, grouped them, and copied my line to each one of the points. I set the appropriate direction of the line:
 |
 |
| I now have lines hanging from a tree branch. I converted them into wires, selected the points that are touching the branches, and converted those into "Wire Pin Constraints". In the "AutoDopNetwork", make sure the "Constrain To Animation" option box is ticked. I added some wind and drag forces in my DOP Network to drive my strands. I added a few more customizations in the form of expressions and noise to randomize the forces and make the movement more natural. | |
| Initial LOD test using curves. Rendering full poly spanish moss on a system with 2 gigs of ram was unsuccessful as renderman keep running out of memory. I will try another render shortly. Also I need to figure out how to get custom SLIM shaders into Houdini. |
Improvisation
It turns out that I probably got to the limit of what I was actually trying to accomplish for this project. Renderman returned an "Out of memory" error message every time it attemted to render out my high poly spanish moss, which consist of 207,293 polygons in a 41 MB rib file. It was only L-System generation 5 but still seems to be too heavy. Additionally, I was trying to render 400 frames of a tree full of these things... close up (with raytrace... DOF, etc.). I carried the L-System mesh down to generation 3, about a 60% reduction in geometry and still got insane rendertimes if not the same "out of memory" error. I wanted to render the moss up close, instead of distant strands. As a result, I decided to improvise with the L-Systems Curves.
Continued...Shader Details
Ironically, one of the reasons I approached this project with Houdini was because not much people use this highly effective procedural based software. I believe that by me using it and developing solutions with the other houdini users, we have reached a step closer in having full houdini-renderman support and Implementation at School of Film/Digital Media.
My Next step was to the build the spanish moss shader. I started by going into SLIM and setting up a basic velvet shader. I then exported the appearance as a flattened shader. This creates two files. The .sl and .slo.
 |
 |
Opening the .sl file in cutter shows me that the shader is referencing two archives. The "psxlRayUtil.h" and "pxslAOV.h" archives should be in my custom shader directory along with a copy of the .sl and .slo files if this shader is to work with my level of detail RIB. These renderman archives can be found at:
\Pixar\RenderMan-Studio\lib\slim\include
This is a close up render of the moss strands hanging on a branch, being affected by wind forces.
| I am intrigued by how much I can still push the quality of this render using just curves in place of real geometry. Rendered with raytrace, 4 lights and Depth of Field using Renderman in Houdini. |