Houdini-Renderman Workflows
Information is lacking when it comes to specific Houdini-Renderman workflow issues. So I chose to dedicate an entire section to it. First I will explain how to properly set up the renderer in Houdini.
Setting up Cutter
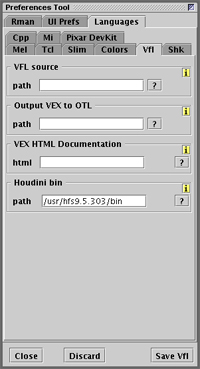
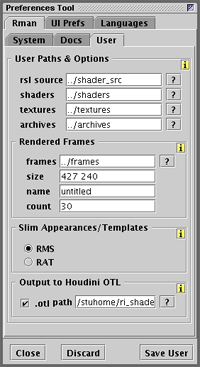
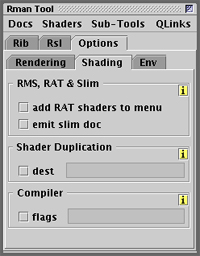
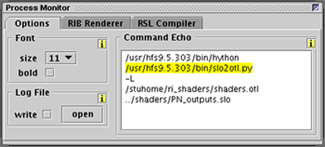
Cutter is a major part of my RenderMan workflow. Here is how to make sure it outputs shaders into something Houdini understands; A digital Asset file format with a .otl extension (Operator Type Library). Traditionally an .otl file can be generated from a compiled RenderMan shader by running a small python script called slo2otl.py. This python script comes with Houdini. Cutter works by calling this script each time a shader is compiled, but in order for Cutter to do this it must first know where the Houdini bin (binary) directories are. The Houdini bin path is specified by going to Preferences > Languages > Vfl. In my case, the bin directory is located at /usr/hfs9.5.303/bin. You can then tell cutter where to output the .otl files by going to the Rman > User tabs in the Preferences. Please not at this point Cutter will still output slim docs by default, which is not desired for a Houdini workflow. This option must be turned of by going to Tools > Show Renderman Tool then going to the Options > Shading tab. Make sure the two options under "RMS,RAT & Slim" are turned off.With these options set, if you compile a shader, you should see in Cutter's Process Monitor that the "slo2otl.py" script is being executed. The path to the .otl will also be echoed. At this point, Cutter should be set up.
For more information about cutter please visit Professor Malcolm Kesson's website here.
Setting up the Renderer
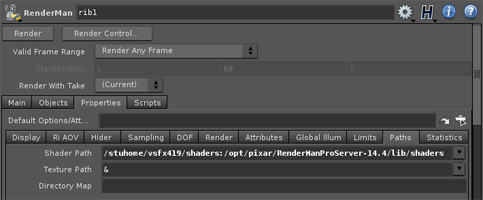
After laying down a Renderman Output Driver in Houdini, the second thing that needs to be done is to tell the driver where all your shaders is going to be located. There are two paths that had to be considered. The location of your custom shaders and the location of RenderMan's native shaders. In my case, my custom shaders are stored in "/stuhome/vsfx419/shaders" and RenderMan's shaders are stored in "opt/pixar/RenderManProServer-14.4/lib/shaders." Note that i'm telling houdini to point to the same shader path that I use when compiling shaders in Cutter. In the RenderMan output driver, the "Shader Path" parameter is located in the "Properties" > "Path" tab. Multiple shader paths can be entered in the Shader Path, each separated by a colon in this format:
/Shader path 1:/Shader path 2
If you are using Linux, these shader paths can be specified using a custom bash file that will be loaded automatically upon you logging in. BASH_CUSTOM is a plain text file containing the following command:
export HOUDINI_RI_SHADERPATH=/Shader path 1:/Shader path 2Save this file in your home directory. If it loads successfully you should not have to explicitly specify a path in Houdini's RenderMan Output Driver.
At this point install your digital asset and Houdini should have all of the assets it needs to do a render. However, you still need to specify to Houdini how it should find and utilize these newly installed assets.
In Houdini, go to File > Install Digital Asset Library and search for your compiled .otl file. All custom RenderMan shaders included in this .otl show now be available for use in SHOP context.
Standard RIB Insertion Points in Houdini
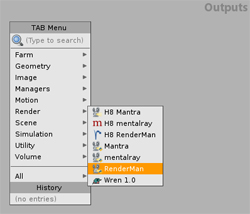
Here, I will go through exporting custom RenderMan AOVs in Houdini to illustrate where standard RIB insertion points are located in Houdini.
The Shader code to output custom AOVs can be found here. The RIB file can be found here, though I will go through the RIB systematically. There are a few options in the RIB that needs to be specified in Houdini to be able to successfully output AOVs. These are:
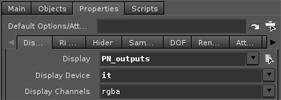
Display "PN_outputs" "it" "rgba" In the RIB this block specifies the main output channel. In Houdini go to the RenderMan Output Driver, then the Properties > Display tabs. |
 |
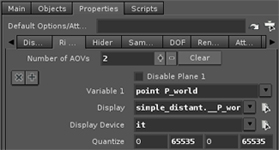
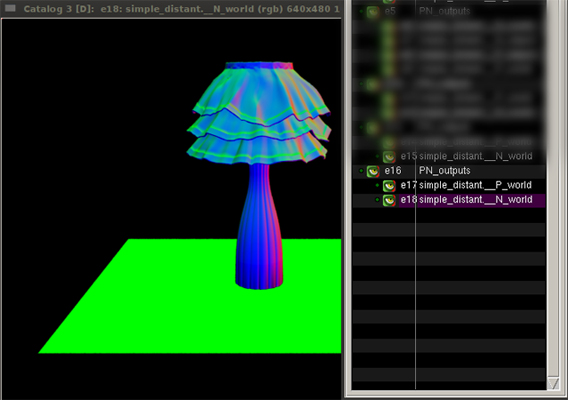
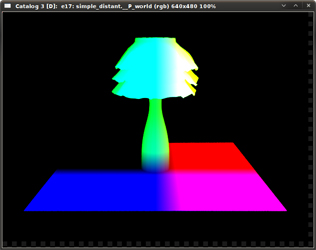
| DisplayChannel "point P_world" "quantize" [0 65535 0 65535] & Display "+simple_distant.__P_world" "it" "P_object" In the RIB these blocks specify additional output channels. In the RenderMan Output Driver, these options can be explicitly specified by going to Properties > Ri AOV tab. Any amount and any type of AOV can be entered in the Ri AOV tab. |
 |
Setting up the Shaders on a Scene
At this point, your .otl file should already be installed. A smart way to set up a scene in Houdini would be to use a rib archive for rendering, but a .obj version just for visualization in the viewport.
| Import the geometry using a file node and use a "transform" node to scale it appropriately. Use another "transform" node to essentially "freeze" the transformations. Right-click on your final node and choose "Save Geometry". Be sure to save it as a .rib file by changing the file format using the small box to the right. |  |
| Go into SHOP context, hit TAB, and create a "RMan Delayed Read Archive". Two things need to be specified in this procedural shader. The first thing in the "Main" tab is the RIB file path. The second option is in the "RIB Bounds" tab. Be sure to set the "Bounding Box" option to "Specified By SOP's Bounding Box." Choose your last SOP of your geometry to specify the sop Bounds. In the case of my example, it would be my LAMP node. |  |
| While you are in SHOP context, hit TAB and drop in your custom shader. In my case it's PN_outputs. Providing that you installed the .otl, the shader should be among the list of other shaders available to houdini. Go now to OBJ context. On your Geometry node two things need to be specified. Click on the "Material" tab and specify your AOV output shader you just added in SHOP context. Also, in the Render > Geometry tab, specify the path to the Delayed Read Archive shader. | 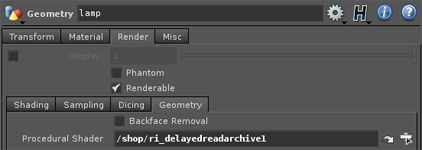 |
Testing the Render
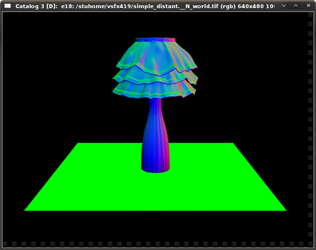
| It is a smart idea to test your render by rendering your scene as a RIB first. This way, if there is an error, you can pinpont where in Houdini it originates from. Go back to your RenderMan output driver and enable this option in the "Main" tab. Specify a path and hit "Render." Open the RIB in cutter and if all goes well, you should have your render and multiple AOVs | 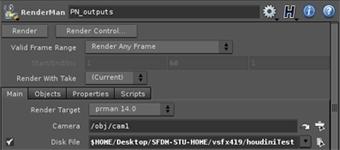 |
In my case, I am using the output driver "it", which comes with RenderMan Studio.
 |
 |
| vector N_world | point P_world |
Change all the references in the RenderMan Output Driver from "it" to "framebuffer."
Invoke MPlay on Linux
To have the renderer invoke mplay instead of a framebuffer window, go to the command prompt and type "proto_install". There will be a list of about 21 houdini drivers and assets that you can install. The one you need, called "RManDisplay.inst" may be the last on the list. Choose to install it and follow the prompts. Interestingly enough, extra AOVs appear in MPlay as additional frames instead of secondary channels of an image.
You should be able to get MPlay working in windows using a similar meathod. You would access the houdini-specific command by either using the Houdini Command Line Tools, or adding the "houdini/bin" folder to the system path in your environment variables. I'll give it a test and see how it works.